[Discontinued] Wireless Game Controller TX Board (Make your NES/SNES controller wireless)
$0.00 USD
As an extension to the Wireless Gameboy/GBA Controller project in which we can re-use the receivers available (firmware update required if you purchased one before 1st May 2019) so you can mod your NES & SNES controllers with a board to make them into a Wireless Game Controller. You will need a board and receiver as a minimum to get started.
Questions? Jump on our Discord server where we and other users can help you or contact us via Twitter.
Boards available: NES Drop-in TX board, SNES Drop-in TX board, SNES Mod TX board (USB side or end mounted).
This is a DIY part, you’ll need to make some modifications to your controller plus you will need to solder your LiPo battery leads to the board. Check out the installation instructions for further details.
Description
You will need a board and receiver as a minimum to get started. If you have a receiver already from the Wireless Gameboy/GBA Controller project, you will need to update the firmware.
You can have multiple receivers per transmitter and you can use the same receiver for different wireless controllers. Any receivers/transmitters you purchase will be paired together. Check out the FAQ on the left side menu. You can change some of the button mappings at start up, check the “How to use” section. If you are unsure about your use case, please send us a quick email to support@insidegadgets.com.
Receivers available
To prevent double listing of receivers, you should purchase receivers from the Wireless Gameboy Controller page.
- USB receiver
- NES receiver
- Super Nintendo receiver
- Nintendo 64 receiver
- Gamecube receiver
- WiiMote Expansion Port receiver
- Multi-RX receiver
Transmitters available
NES Drop-in TX
The board only suits a generic NES controller purchased from Ebay, etc, take a look at the installation guide to confirm yours matches. There isn’t much room in the controller so the LiPo I have in mind is 200mAh 3mm thick or 300mAh 3mm thick from AliExpress and should last about 13-18 hours of game play.
Transmitted keys: All
Refresh rate: Every 2ms, the keys are checked and a packet is transmitted to the receiver.
SNES Drop-in TX board
The board only suits the genuine SNES controller, take a look at the installation guide to confirm yours matches. You could use a 700mAh from AliExpress which should last about 40-50 hours of game play, it is a bit too thick at 7.5mm so some of the direction keys may need to be pressed a bit harder. Any battery with a similar size should do, just make sure it’s under 7mm thick.
Transmitted keys: All but it depends on the receiver as to which keys are actually used. There are some special button mappings available – check the receivers page.
Refresh rate: Every 2ms, the keys are checked and a packet is transmitted to the receiver.
SNES TX Mod Board
There are 2 boards to choose from, the only difference is where the USB connector for charging is mounted.
Transmitted keys: All but it depends on the receiver as to which keys are actually used. There are some special button mappings available – check the receivers page.
Refresh rate: Every 2ms, the keys are checked and a packet is transmitted to the receiver.
Please note that there is no encryption or security available for these devices, while this should pose no issue for home users, it would be possible for an attacker to potentially take over your controls or block your control.
Wish List:
- Gamecube TX board
- N64 TX board
Disclaimer: We shall not be held liable to and shall not accept any liability, obligation or responsibility whatsoever for any loss or damage that may occur by using this product directly or indirectly.
NES Drop-in TX Board - Installation
This will only work for a generic NES controller.
Please make sure when you open your controller it matches the one above.
1. Unscrew and remove the PCB that came with the controller.
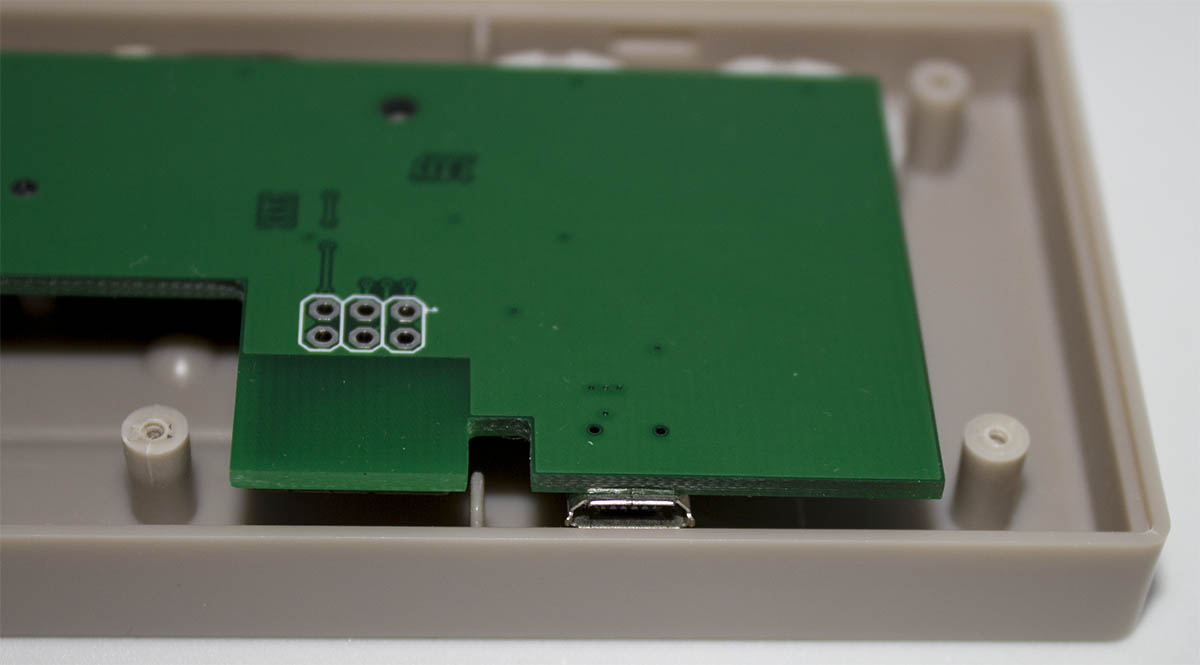
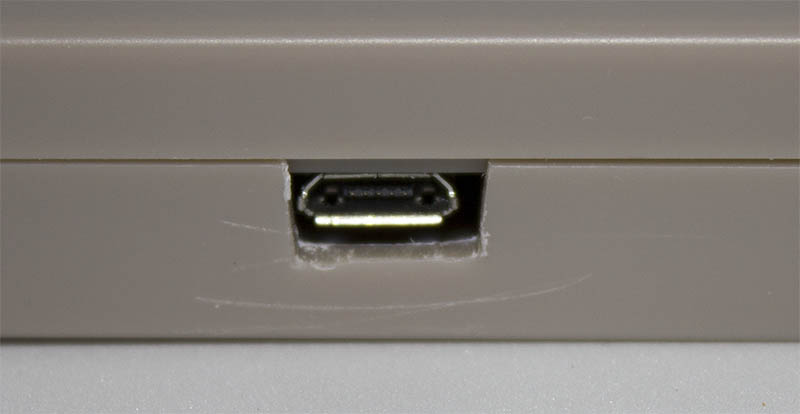
2. Place the NES Drop-in TX board in place so you know where to file down the controller for the USB port.

3. Once you screw in the board, it lifts the USB connector a little bit so you don’t need to file as much as I did.
4. Solder the battery and place it in the location shown below, the battery should only be 3mm thick which is a difficult requirement.
5. Gently close the case, tighten the screws and you’re done!
NES Drop-in TX Board - How to use
If you order the TX board and receiver in one order, they will come paired. All you need to do is install the TX board, plug in the receiver, configure your software (if using a USB receiver) and you’re good to go.
Under normal operation you should see the LED on the TX board and the receiver light up, this shows that data is being transmitted/received.
Turn on / off the TX board
Press the start button until you see the LED turn on. After 5 minutes of no activity the TX board will automatically power off. If you wish to turn off the TX board sooner, hold down the start button for 5 seconds until the LED turns off.
Reconfigure the RF channel/address and Packets per keypress
When the TX board LED is off, hold down the select button for 2-3 seconds and then let go, the LED should turn on.
Down/Up = Decrease/Increase the RF channel
Left/Right = Decrease/Increase the RF address
Select/Start = Decrease/Increase the PPK
Every time you press a key, the LED will turn off until you let go of the key.
Press A to start transmitting the new configuration, plug in the receiver, wait a few seconds and then press A again to finish, the LED should turn off.
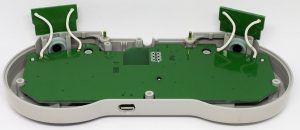
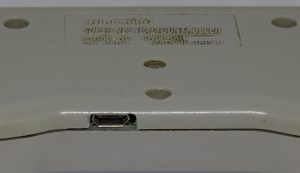
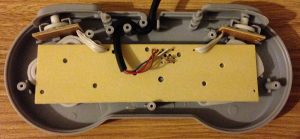
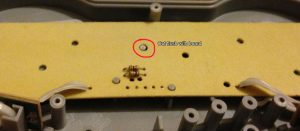
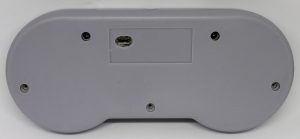
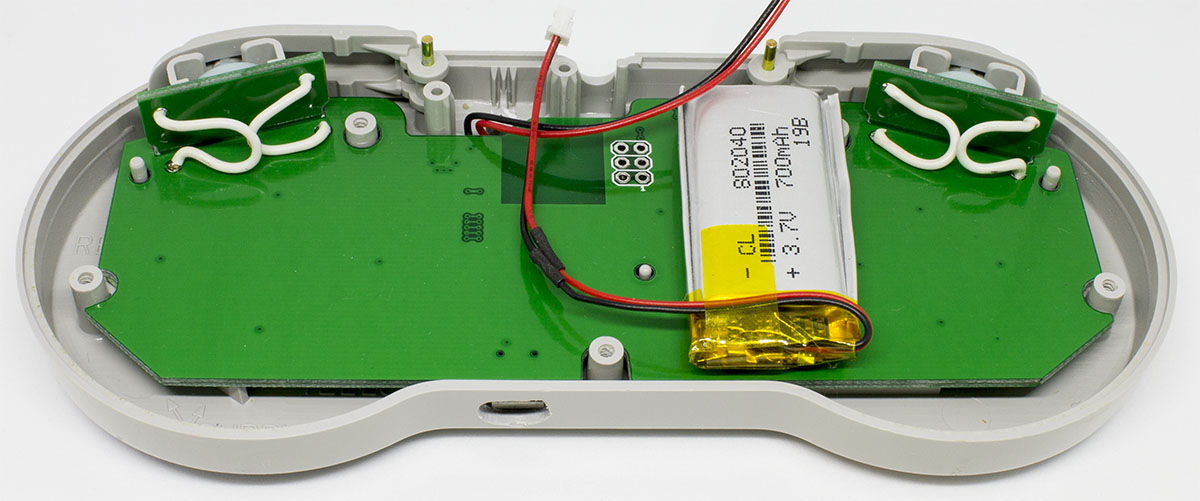
SNES TX Drop-in board - Installation
For a Genuine SNES Controller
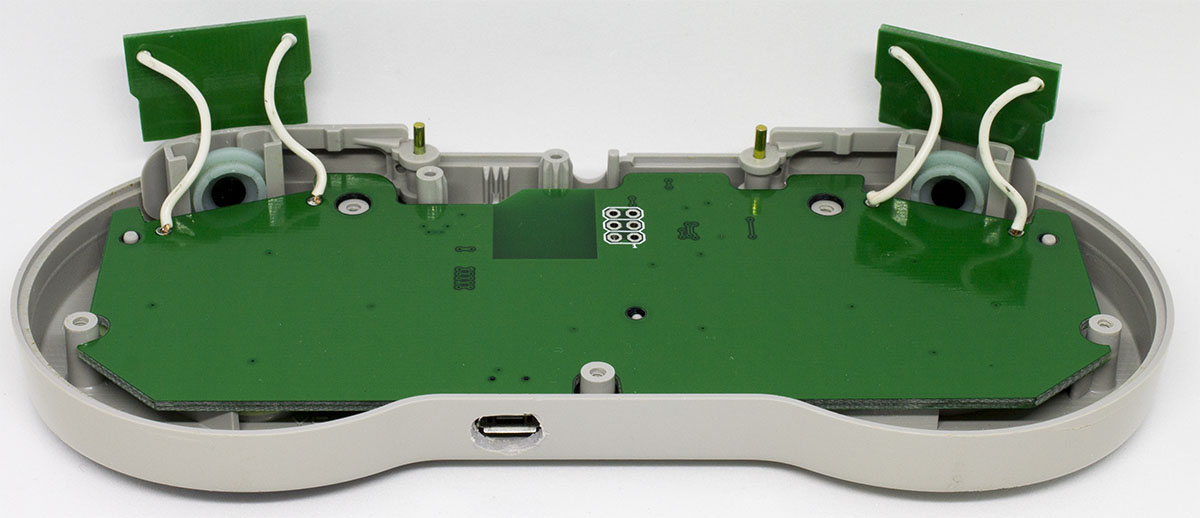
1. Take apart the controller, remove the PCB and make sure the drop-in board fits.
2. With the board in place, mark out where you need to drill/file down material for the USB connector.
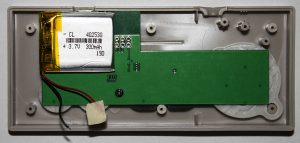
3. Solder your battery leads to the drop-in board or use a connector and hook up the battery. You should see the LED on the board blink once power has been applied.
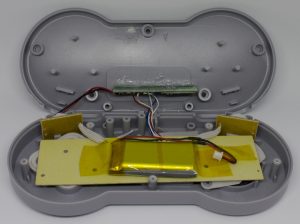
4. You need to position the battery as shown above, it’s a tight fit but you need to be very careful when closing the shell that there is no pressure applied to the battery. You may have to half close the shell and move the battery/leads very slightly into place.
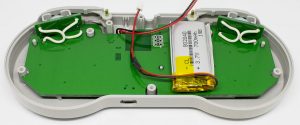
Once completed, you now have a wireless SNES controller!
SNES TX Drop-in board - How to use
If you order the TX board and receiver in one order, they will come paired. All you need to do is install the TX board, plug in the receiver, configure your software (if using a USB receiver) and you’re good to go.
Under normal operation you should see the LED on the TX board and the receiver light up, this shows that data is being transmitted/received.
Turn on / off the TX board
Press the start button until you see the LED turn on. After 5 minutes of no activity the TX board will automatically power off. If you wish to turn off the TX board sooner, hold down the start button for 5 seconds until the LED turns off.
Reconfigure the RF channel/address and Packets per keypress
When the TX board LED is off, hold down the select button for 2-3 seconds and then let go, the LED should turn on.
Down/Up = Decrease/Increase the RF channel
Left/Right = Decrease/Increase the RF address
L/R = Decrease/Increase the PPK
Every time you press a key, the LED will turn off until you let go of the key.
Press A to start transmitting the new configuration and you will see the LED blinking. Plug in the receiver, wait a few seconds and then press A again to finish, the LED should turn off.
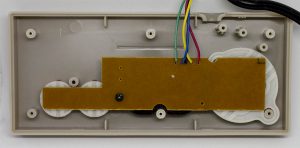
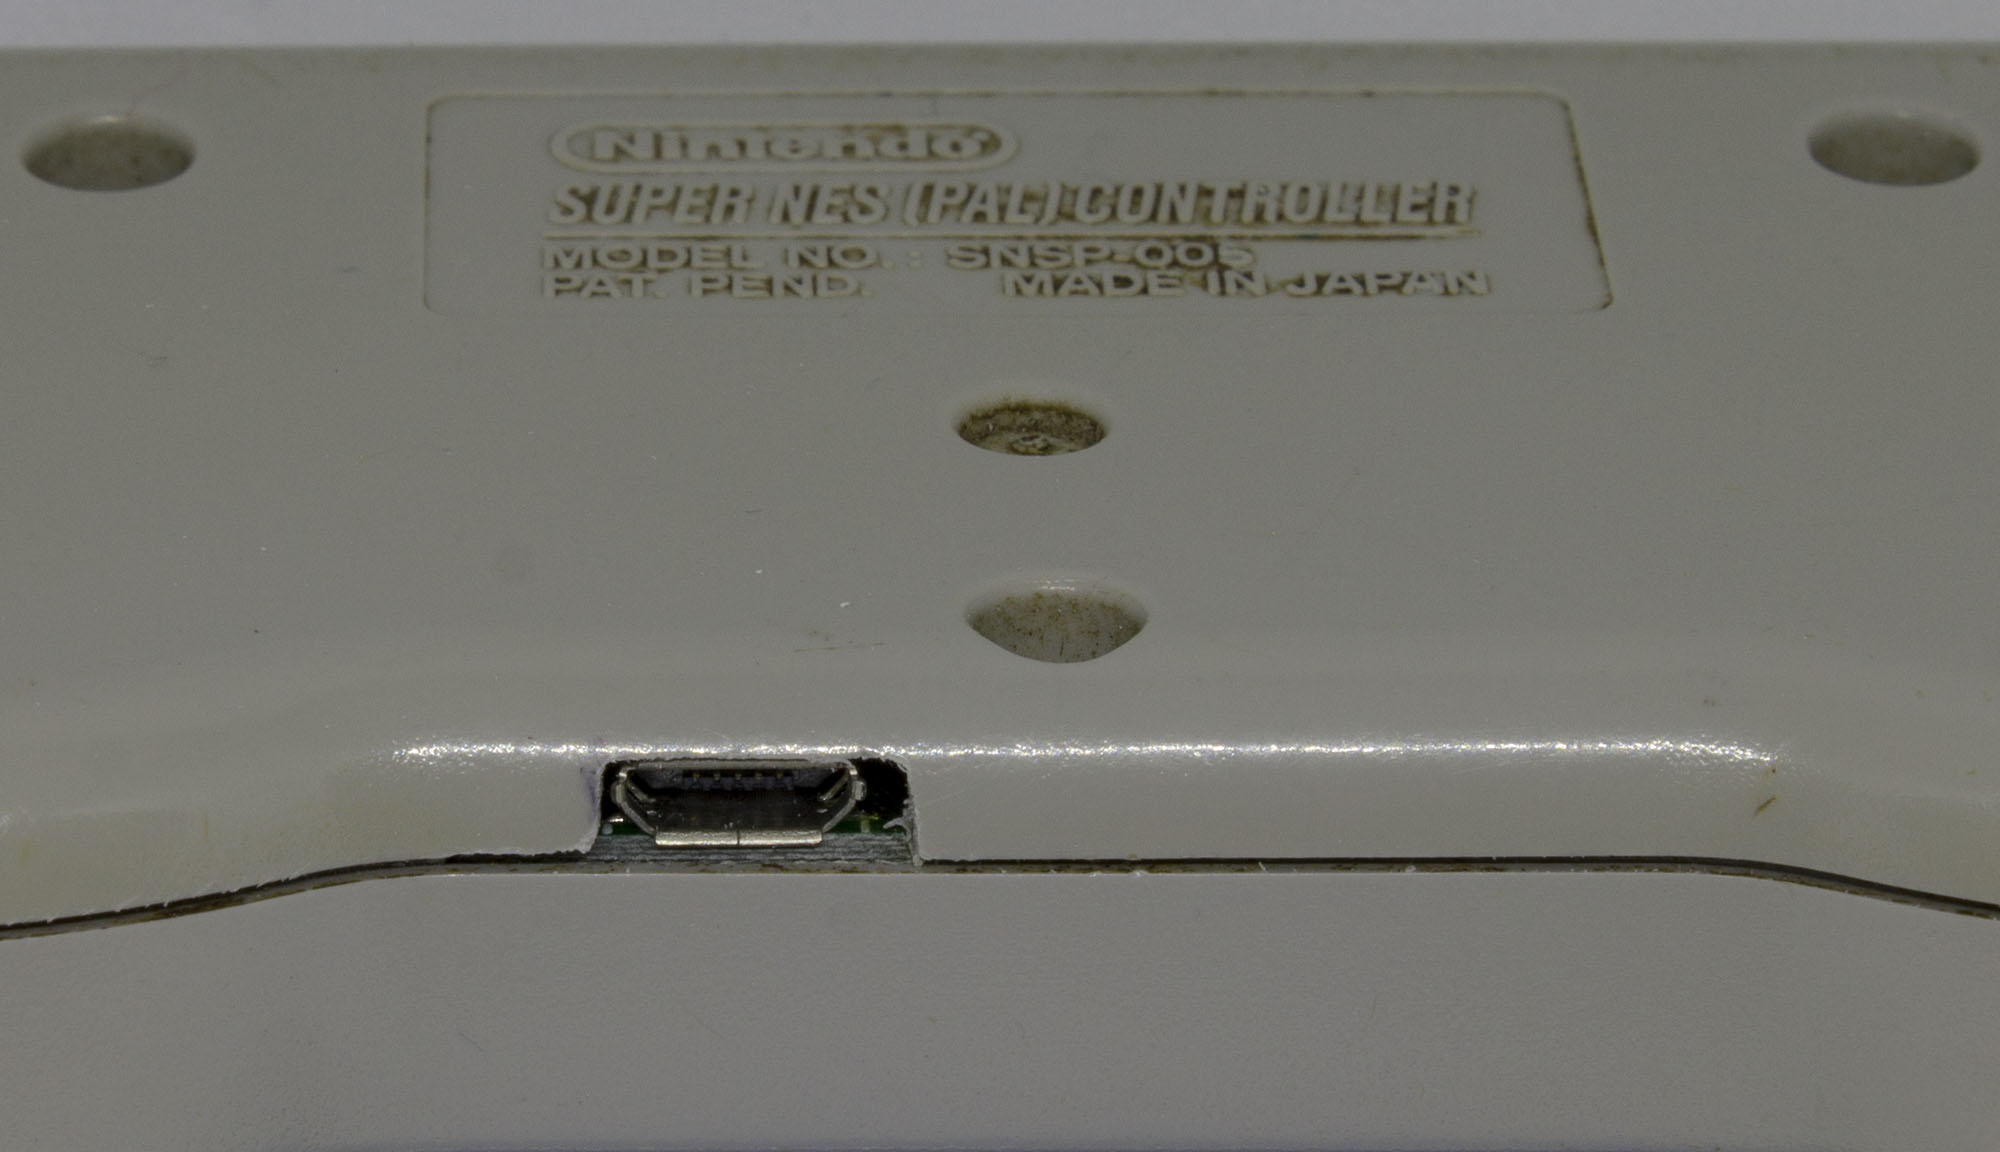
SNES TX Mod board - Installation
For a Genuine SNES Controller
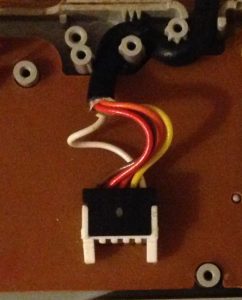
1. Take apart the controller and remove the cable going to the board.
2. De-solder the cable connector from the PCB, this is where our TX board will go.
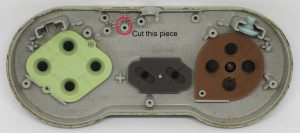
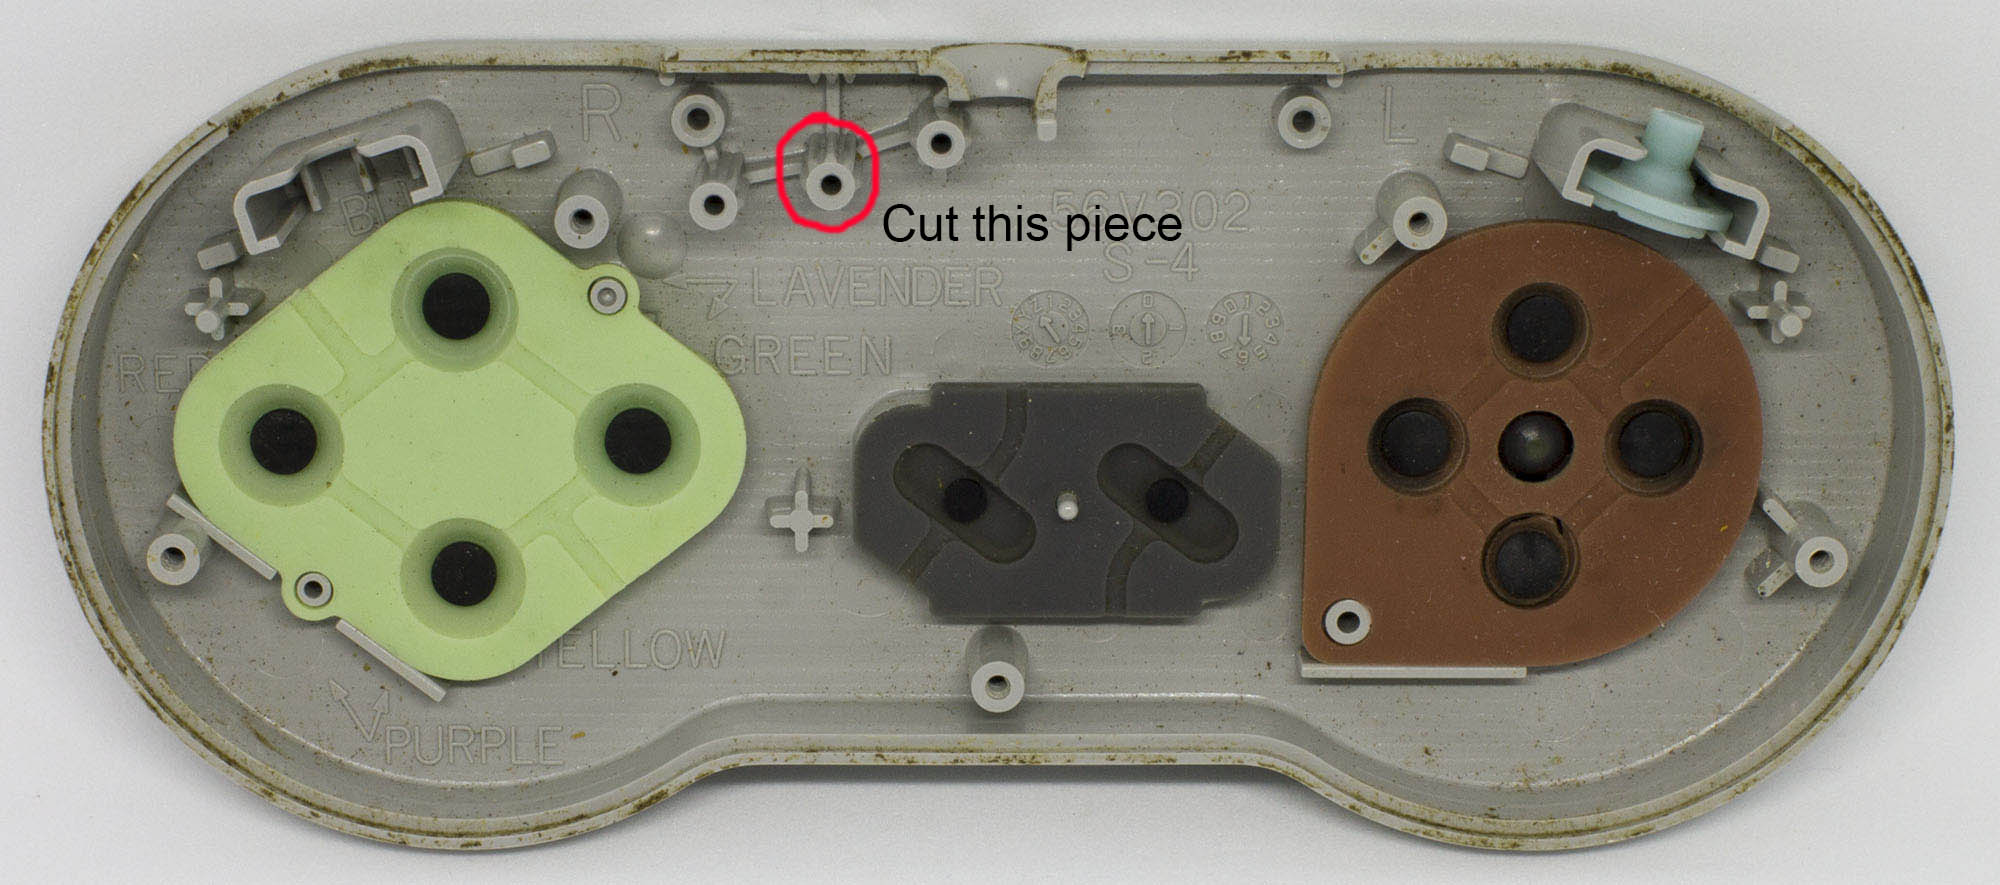
3. Cut the piece as shown.
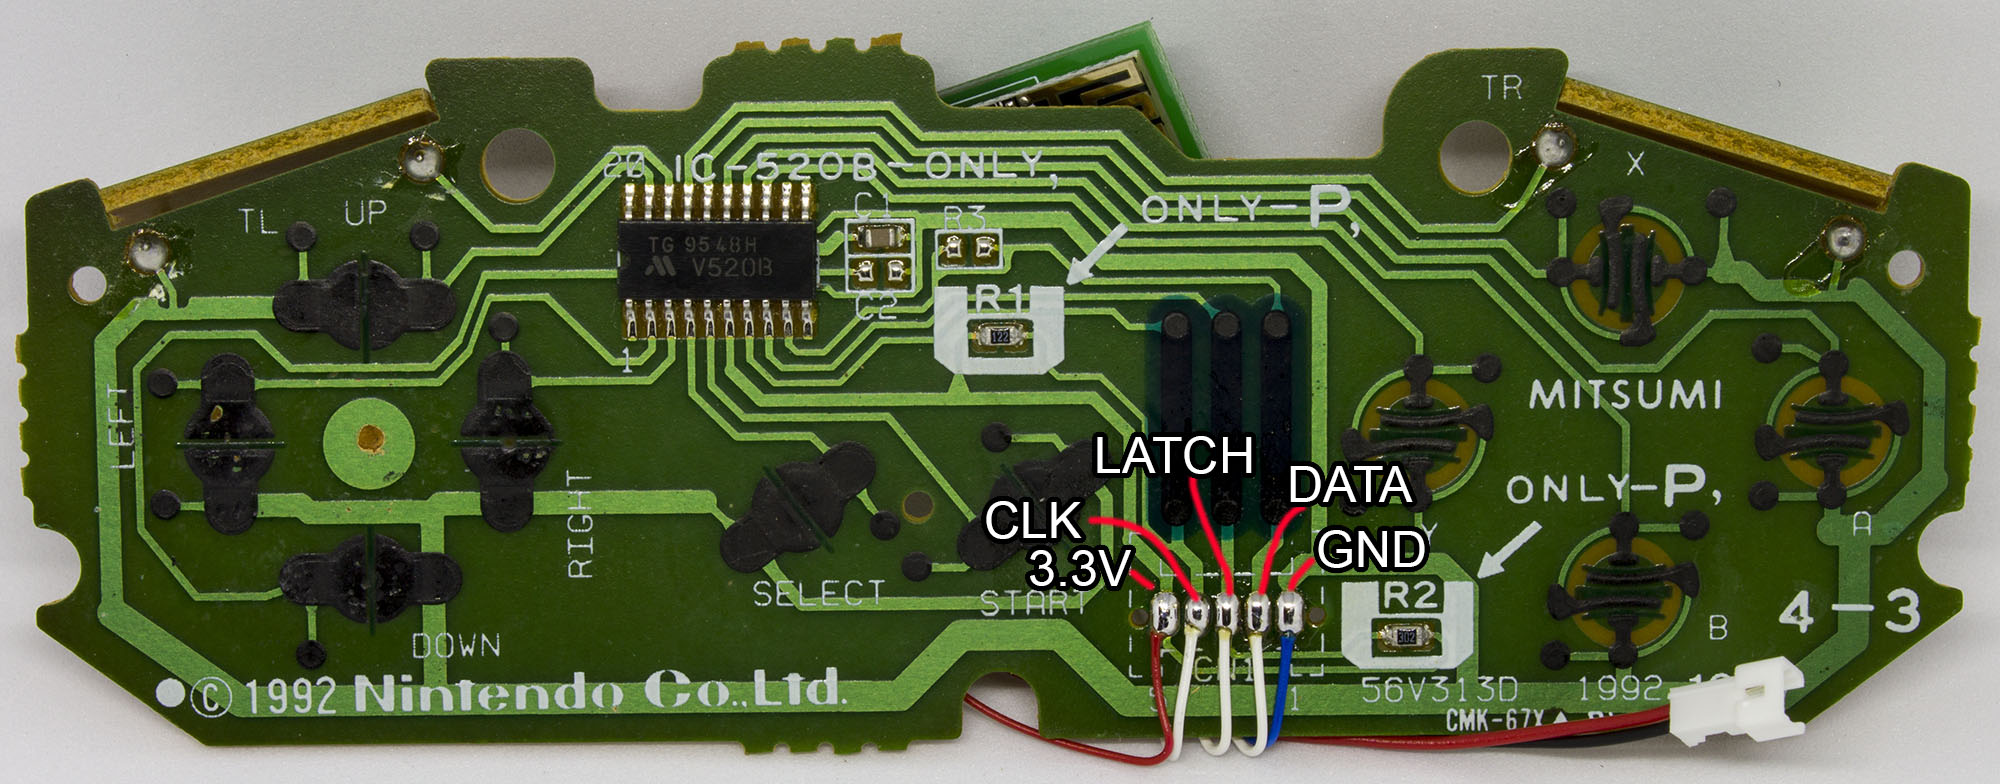
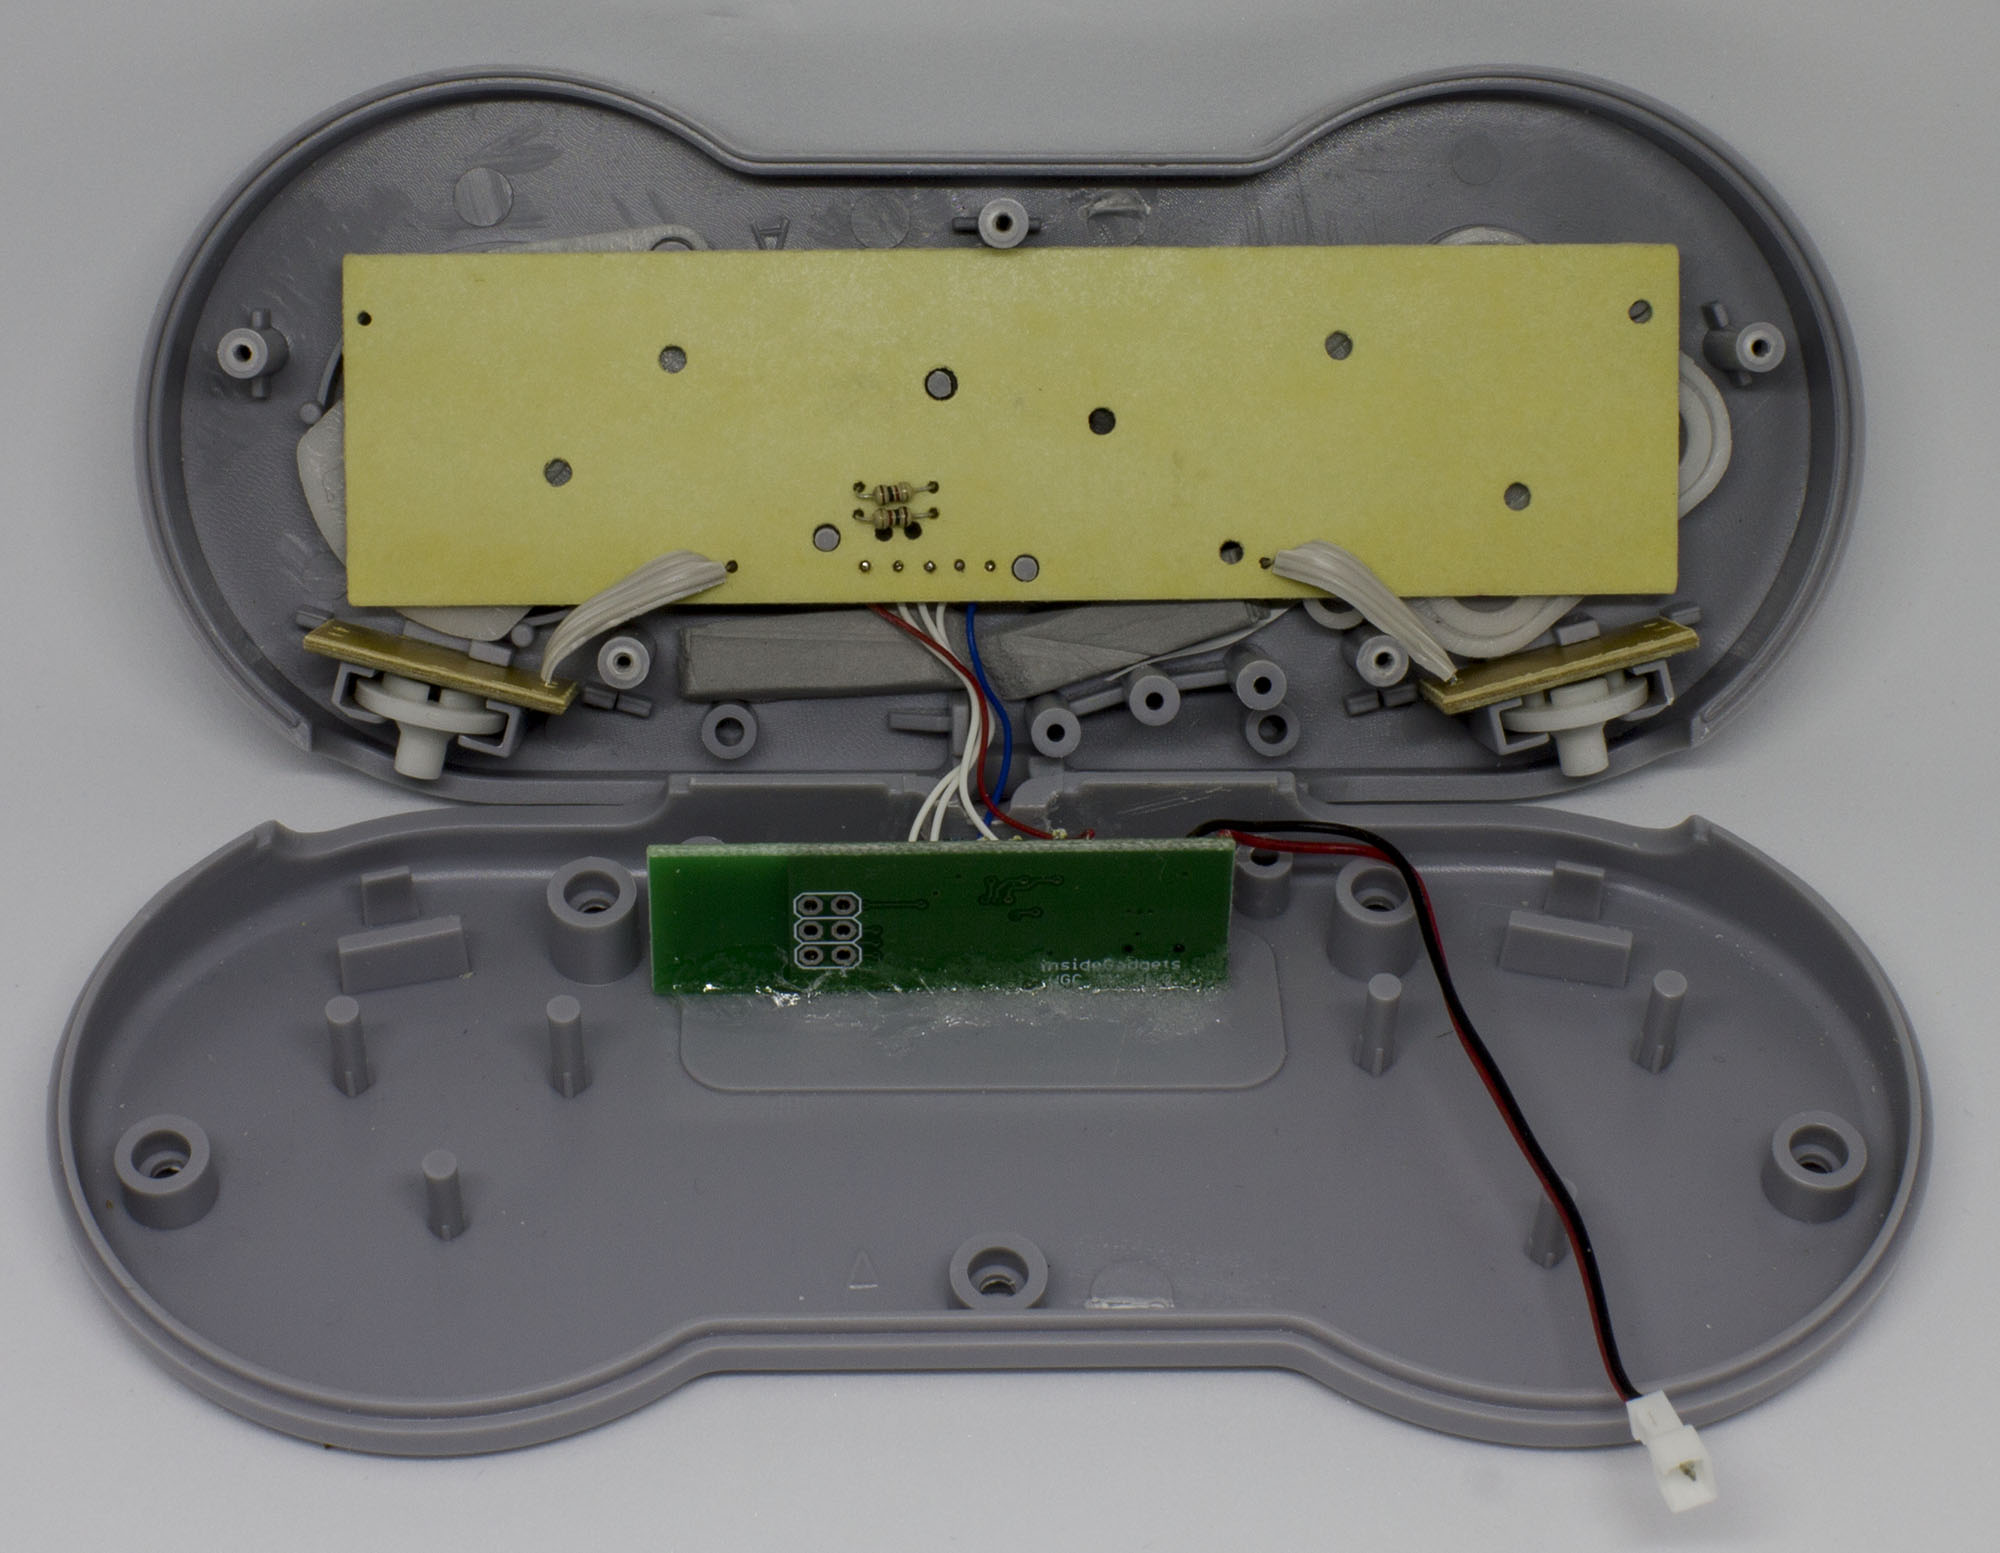
4. Solder 5 wires to the SNES board
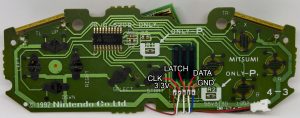
5. Position the SNES TX board and solder the 5 wires to it.
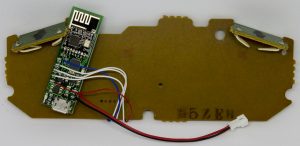
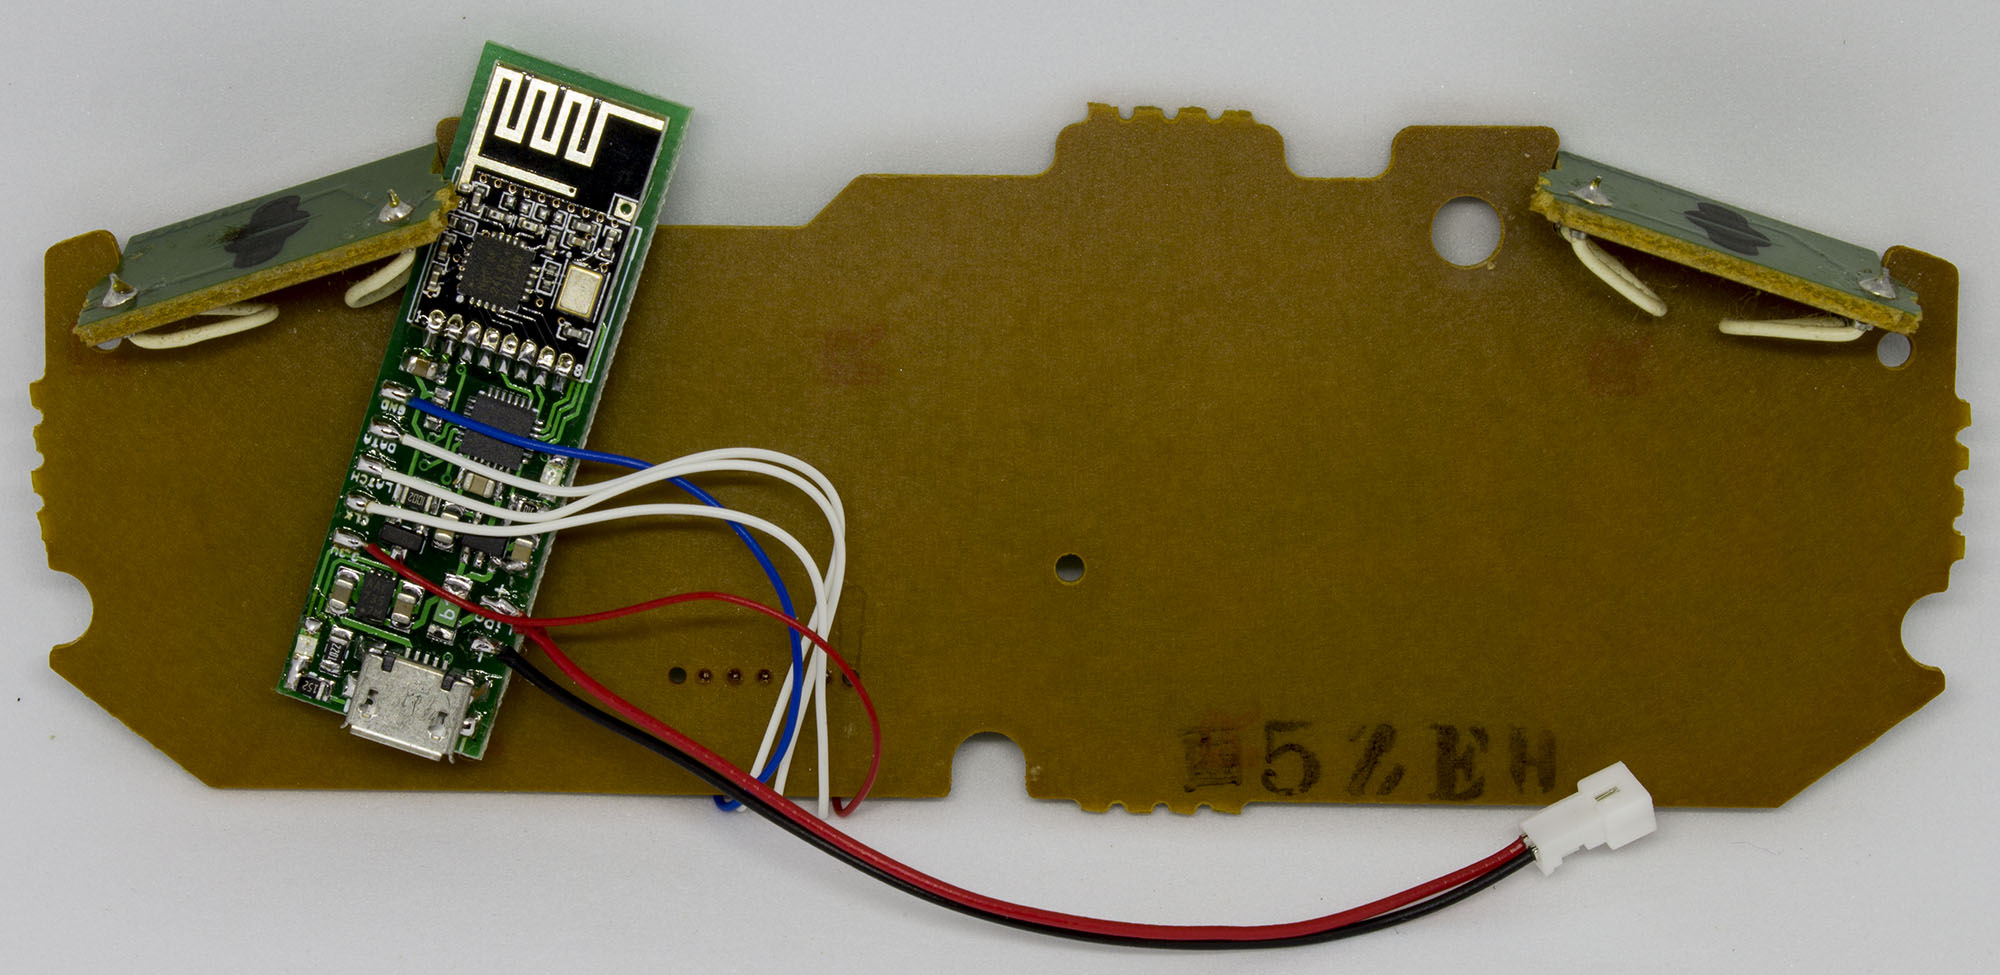
6. Position the SNES TX board as shown, it should just fit in place.
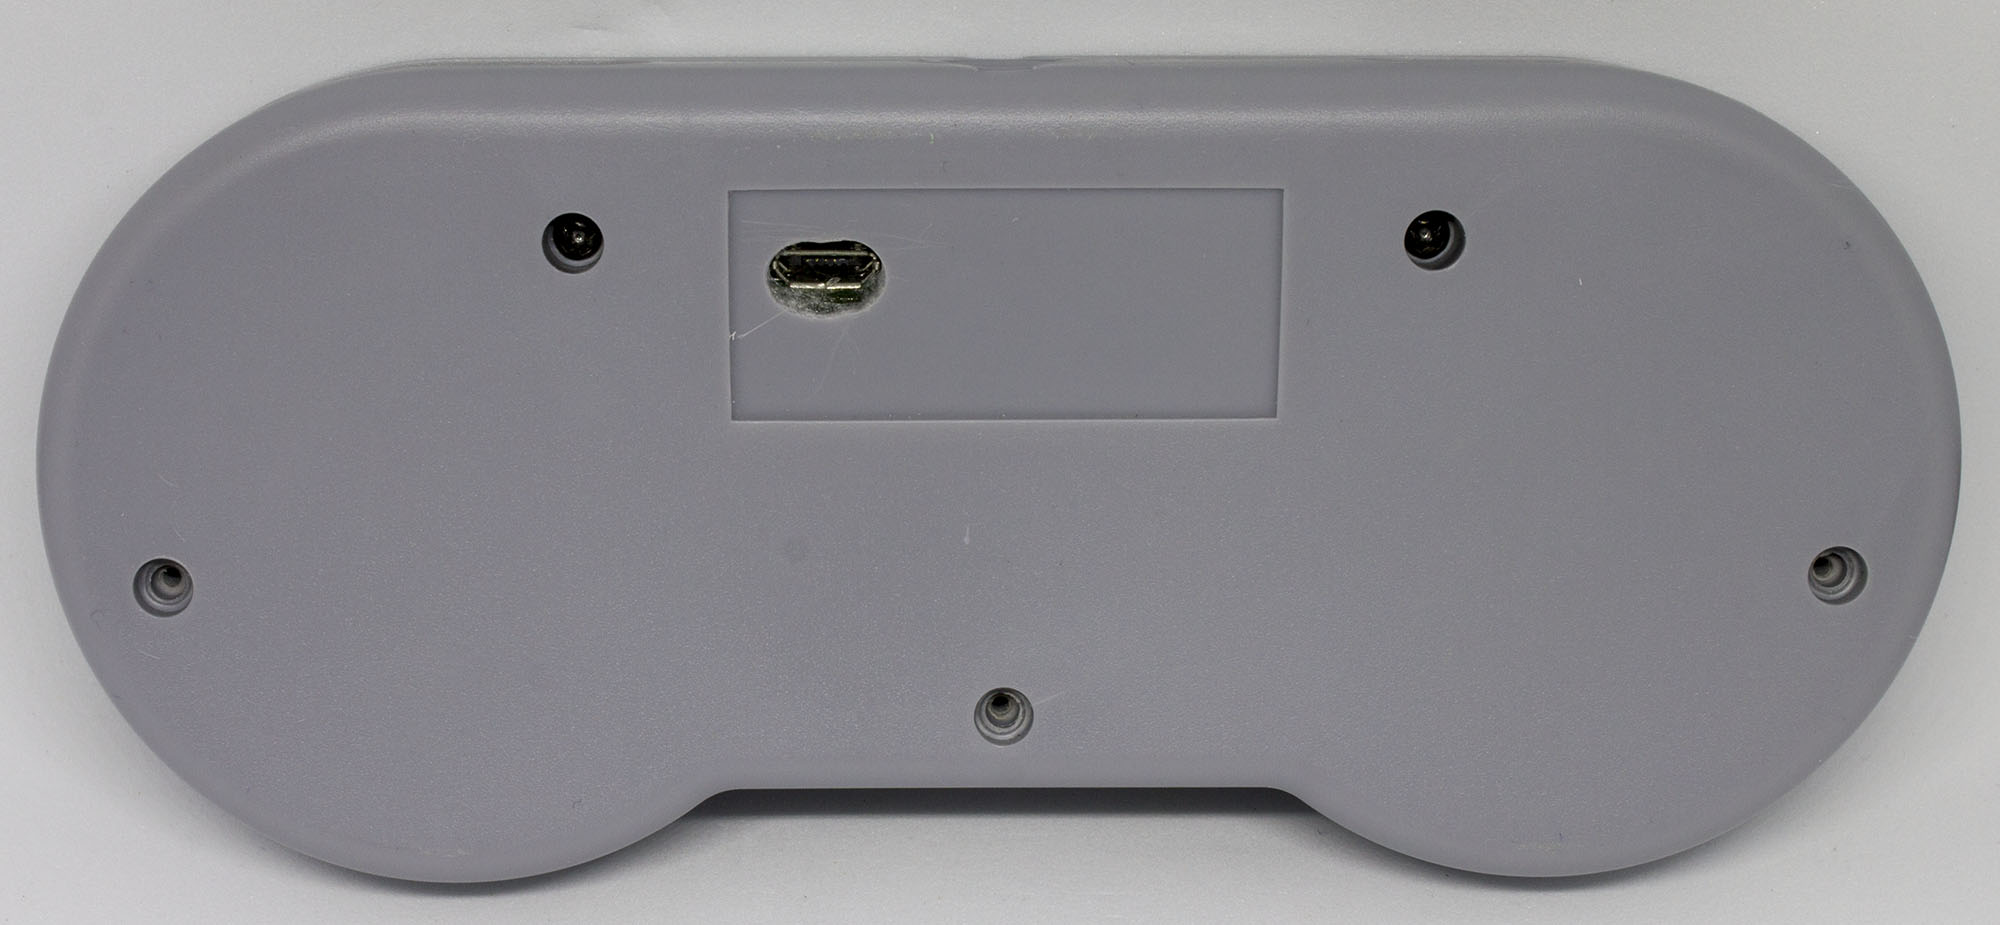
7. Line up the bottom shell to the top shell so you know where you need to file down material for the USB connector. You can glue the TX board in place if you like.
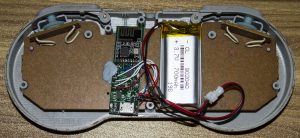
8. Solder or connect the battery and you should see the LED blink. You need to position the battery as shown above (but a bit more to the right), it’s a tight fit but you need to be very careful when closing the shell that there is no pressure applied to the battery. You may have to half close the shell and move the battery/leads very slightly into place.
Once completed, you now have a wireless SNES controller!
For a Generic SNES Controller
1. Take apart the controller and remove the cable going to the board.
2. De-solder the cable from the PCB.
3. Cut the piece as shown so it is flush with the board. This is where the battery will go so we don’t want anything to poke it.
4. Solder 5 wires from the SNES board to the SNES TX board.
5. Position the SNES TX board sideways and align the bottom piece so you know where to file down the back for the USB. Once its filed down, glue the TX board in place.

6. Solder or connect the battery and you should see the LED blink.
You need to position the battery as shown. It’s a tight fit but you need to be very careful when closing the shell that there is no pressure applied to the battery. You may have to half close the shell and move the battery/leads very slightly into place.
Once completed, you now have a wireless SNES controller!
SNES TX Mod board - How to use
If you order the TX board and receiver in one order, they will come paired. All you need to do is install the TX board, plug in the receiver, configure your software (if using a USB receiver) and you’re good to go.
Under normal operation you should see the LED on the TX board and the receiver light up, this shows that data is being transmitted/received.
Turn on / off the TX board
Hold the start button down for at least 10 seconds until you see the LED turn on. After 5 minutes of no activity the TX board will automatically power off. If you wish to turn off the TX board sooner, hold down the start button for 5 seconds until the LED turns off.
Reconfigure the RF channel/address and Packets per keypress
When the TX board LED is off, hold down the select button for 10 seconds until the LED turns on.
Down/Up = Decrease/Increase the RF channel
Left/Right = Decrease/Increase the RF address
L/R = Decrease/Increase the PPK
Every time you press a key, the LED will turn off until you let go of the key.
Press A to start transmitting the new configuration, plug in the receiver, wait a few seconds and then press A again to finish, the LED should turn off.
Only logged in customers who have purchased this product may leave a review.
![[Discontinued] Wireless Game Controller TX Board (Make your NES/SNES controller wireless)](https://shop.insidegadgets.com/wp-content/uploads/2019/04/tx-boards-v2.jpg)
![[Discontinued] Wireless Game Controller TX Board (Make your NES/SNES controller wireless) - Image 2](https://shop.insidegadgets.com/wp-content/uploads/2019/04/IMG_6061.jpg)
![[Discontinued] Wireless Game Controller TX Board (Make your NES/SNES controller wireless) - Image 3](https://shop.insidegadgets.com/wp-content/uploads/2019/04/IMG_6062.jpg)
![[Discontinued] Wireless Game Controller TX Board (Make your NES/SNES controller wireless) - Image 4](https://shop.insidegadgets.com/wp-content/uploads/2019/04/IMG_6150.jpg)
![[Discontinued] Wireless Game Controller TX Board (Make your NES/SNES controller wireless) - Image 5](https://shop.insidegadgets.com/wp-content/uploads/2019/04/IMG_6065.jpg)
![[Discontinued] Wireless Game Controller TX Board (Make your NES/SNES controller wireless) - Image 6](https://shop.insidegadgets.com/wp-content/uploads/2019/04/IMG_6126.jpg)
![[Discontinued] Wireless Game Controller TX Board (Make your NES/SNES controller wireless) - Image 7](https://shop.insidegadgets.com/wp-content/uploads/2019/04/IMG_6127.jpg)
![[Discontinued] Wireless Game Controller TX Board (Make your NES/SNES controller wireless) - Image 8](https://shop.insidegadgets.com/wp-content/uploads/2019/04/IMG_5996-1.jpg)
![[Discontinued] Wireless Game Controller TX Board (Make your NES/SNES controller wireless) - Image 9](https://shop.insidegadgets.com/wp-content/uploads/2019/04/IMG_5944S.jpg)
![[Discontinued] Wireless Game Controller TX Board (Make your NES/SNES controller wireless) - Image 10](https://shop.insidegadgets.com/wp-content/uploads/2019/04/IMG_5995.jpg)
![[Discontinued] Wireless Game Controller TX Board (Make your NES/SNES controller wireless) - Image 11](https://shop.insidegadgets.com/wp-content/uploads/2019/04/IMG_5986.jpg)
![[Discontinued] Wireless Game Controller TX Board (Make your NES/SNES controller wireless) - Image 12](https://shop.insidegadgets.com/wp-content/uploads/2019/04/IMG_5979.jpg)


![[Discontinued] Wireless Game Controller TX Board (Make your NES/SNES controller wireless)](https://shop.insidegadgets.com/wp-content/uploads/2019/04/tx-boards-v2-324x324.jpg)
Reviews
There are no reviews yet.